


Step-By-Step Guide to Creating the Stunning Crumble and Custard Tray : Free Crochet Basket Pattern

Updated: Aug 26
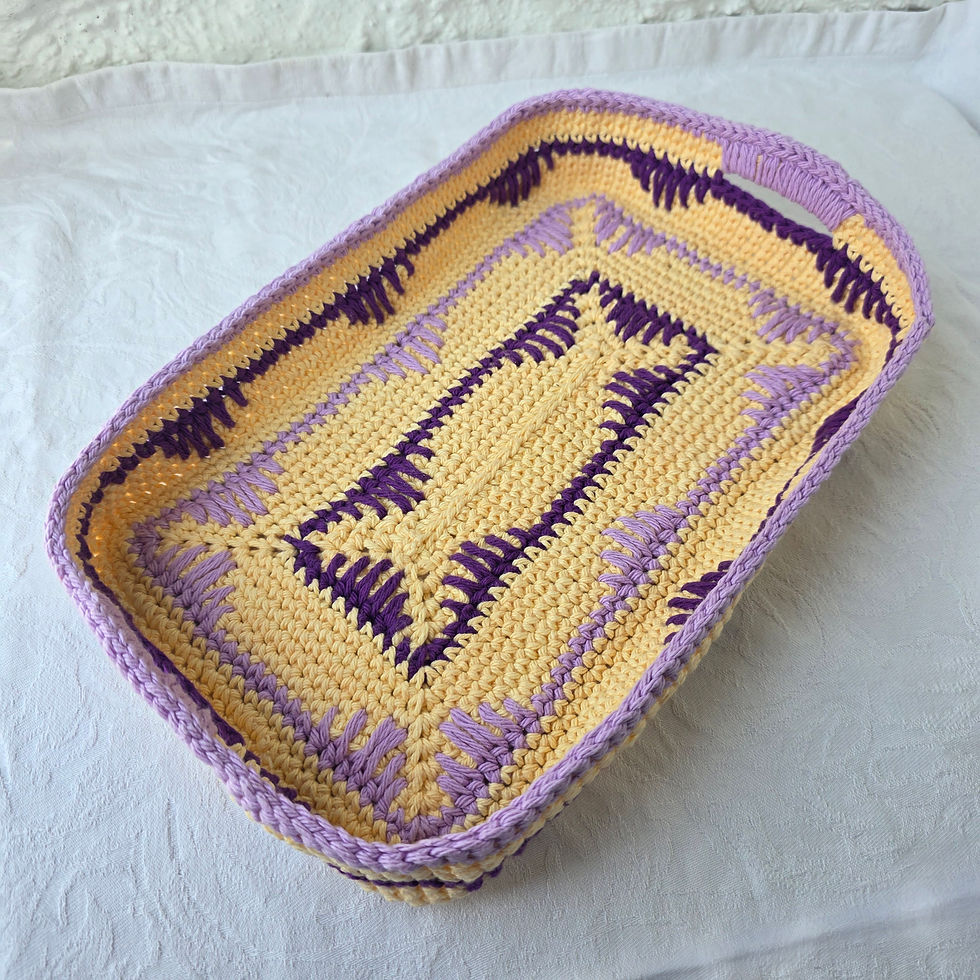
Inspired by warm fruity winter puddings like crumbles and pies with streaks of colourful berries breaking through the surface, this spike stitch tray is a handy make for the home with a fun spike stitch pattern giving a decorative touch and a sturdy finish to the handles.

If you don't like reading patterns directly from a website, a printable pdf pattern download is available on Ravelry
Why make the Crumble and Custard Tray from this free crochet basket pattern?

A basket to throw your crochet into when you are interrupted is going to be so handy and this one will look great whenever it’s not in use. A Crumble and Custard Tray from this free crochet basket pattern could also hold the family’s mail, keys etc. or serve as bread or fruit basket for the dining table.
Mine is the perfect size to hold the Christmas crackers! These are a popular place setting gift for the main Christmas meal in the UK and other Commonwealth countries. They have a little firecracker type snap that makes a BANG! when two people pull each holding one end and then a gift, a paper crown and a joke, riddle or motto on a slip of paper are won by the person with the body of the cracker, although of course we share so everyone has a paper crown to wear during the Christmas meal. Do you have these in your country? Let me know in the comments.

The spike stitches are also really satisfying and motivating to work. I could hardly stop making the swatch!
Before you start:
Sizes: One size
Tension: 16 sts and 15 rows measure 10x10cm (4x4in) over main stitch pattern
Working method: Worked in concentric rounds on both side of a foundation chain, always from the right side
Finished measurements
a. Length of Base: 26.5cm/10.5in (note that sides will flare out slightly)
b. Width of Base: 16.5cm/6.5in
c. Height of sides: 7.5cm/3in
Requirements

Lily’s Sugar ‘n Cream aran/worsted (100% cotton; 109m/119yd per 70.9g/2.5 oz) or similar yarn
Sample in:
MC Country Yellow (01612) as: 3 balls/325m/350yd
CC1 Blackcurrant (01318) as: 1 ball/50m/55yd
CC2 Orchid (01137) as: 1 ball/25m/30yd
4.5mm (US H/8) hook
Yarn needle and scissors
Optional: locking stitch markers if you like to mark start of round or corner chsp
Abbreviations, Charts, Key and Special Stitches
st/sts stitch/stitches
R Row/s or round/s
Beg beginning
RS/WS right/wrong side
ch chain (0)
slst slip stitch (.)
dc double crochet (x)
htr half treble (T)
chsp chain space
Spiked htr (UK)/hdc (US) Yrh, insert hook through st directly below on row indicated, yrh and pull loop up to height of current row, yrh and pull through 3 loops.
Spiked dc (UK)/sc (US) Insert hook through st directly below on row indicated, yrh and pull loop up to height of current row, yrh and pull through 2 loops.
How to Crochet Spike Stitch in regular stitches and to create handles
Pattern Notes

Beginning chains do not count as a stitch unless specified in pattern instructions.
There are several methods for working into both sides of a foundation chain and any of these can be used, however they may look slightly different in the finished piece. The sample is worked with the 1st side’s sts in one side loop of the foundation chain and the 2nd side’s sts in the other side loop of the foundation chain.
Note that the 1st st of each side after a corner chsp is hard to see. Take care to work into this to maintain the stitch pattern.
This pattern is provided in both UK terminology and US terminology. Please be sure you are using the instructions in your preferred terminology. I recommend that you read through the pattern before starting.
Method UK Terms (click here for US Terms)

TRAY
Worked in joined rounds from RS.
Base
With MC work 20 ch.
R1(RS): 2 dc in 3rd ch from hook (note that 2nd ch from hook acts as beg ch, which does not count as st and 1st ch from hook counts as 1chsp), 1 ch, 16 dc to last ch, 1 ch, 2 dc in last ch, 1 ch, rotate work to work along other side of foundation ch, 16 dc to last ch, slst in 1st chsp of R1. 36 st, 4 1chsp
R2(RS): 1 ch (does not count as st), [1 dc in 1chsp, 2 ch, 2 dc, 2 ch, 1 dc in 1chsp, 16 dc to next 1chsp] twice, slst to 1st st of R2, slst in 2chsp. 40 st, 4 2chsp
R3: 1 ch (does not count as st), [( 1dc, 2 ch, 1 dc) in 2chsp, dc to next 2chsp] four times, , slst to 1st st of this round, slst in 2chsp. 48 st, 4 2chsp
R4-5: Rep R3 twice more. 64 st, 4 2chsp
Fasten off MC.
R6: Join CC1 with slst, in 1st corner 2chsp of R5, 1 ch (does not count as st), [(1 dc, 2 ch, 1 dc) in 2chsp, 1 dc, * spiked htr in st 2 rows below, spiked htr in st 3 rows below, spiked htr in next 2 sts 4 rows below, spiked htr in st 3 rows below, spiked htr in st 2 rows below, * 1 dc, (1 dc, 2 ch, 1 dc) in 2chsp, 2 dc, work spiked st rep * to * , 8 dc, work spiked st rep * to * , 2dc,] twice, slst to 1st st of R6. 72 st, 4 2chsp
Fasten off CC1.
R7-12: Join MC with slst, in 1st corner 2chsp of R6 and rep R3 six more times. 120 st, 4 2chsp
R13: Join CC2 with slst, in 1st corner 2chsp of R12, 1 ch (does not count as st), [(1 dc, 2 ch, 1 dc) in 2chsp, 2 dc, work R6 spiked st rep * to * , 8 dc, work R6 spiked st rep * to * , 1 dc, (1 dc, 2 ch, 1 dc) in 2chsp, 2 dc, work R6 spiked st rep * to * , {8 dc, work R6 spiked st rep * to * } twice, 2 dc,] twice, slst to 1st st of R13. 128 st, 4 2chsp
Fasten off CC2
Sides
R1(RS): Join MC with slst in 1st corner 2chsp of Base R13, 1 ch (does not count as st) [2 dc in 2chsp, dc in each st to next 2chsp] 4 times, slst to 1st st of R1. 136 st
R2(RS): 1 ch, dc to end, slst to 1st st of this round.
R3-6 Rep R2 four more times.
R7: Join CC1 with slst in 1st st of R6, 1 ch (does not count as st), 3 dc, work Base R6 spiked st rep * to * , 8 dc, work spiked st rep * to * , 7 dc, work Base R6 spiked st rep * to * , {8 dc, work Base R6 spiked st rep * to * , 7 dc, work Base R6 spiked st rep * to * , 8 dc, work Base R6 spiked st rep * to * , 7 dc, work Base R6 spiked st rep * to * , {8 dc, work Base R6 spiked st rep * to * } twice, 4 dc, slst to 1st st of R7.
Fasten off CC1.
R8: Join MC with slst in 1st st of R7, 1 ch (does not count as st), 9 dc, 8 ch, miss 8, 60 dc, 8 ch, miss 8, 51 dc, slst to 1st st of R8. 120 st, 2 8chsp
R9-10: Rep R2 three more times, working into all ch and sts. 136 st
Fasten off MC.
R11: Join CC2 with slst in 1st st of R10, 1 ch (does not count as st), 9 dc, 10 spiked dc in 8chsp, 60 dc, 10 spiked dc in 8chsp, 51dc, slst to 1st st of R11. [140 st]
R12: Slst in each st of R11
Fasten off.
Surface Slip Stitch Reinforcement
From RS, slip stitch across the 20 ch of the foundation chain.
Skip US Terms Method to continue reading Finishing Instructions
Method US Terms (click here for UK Terms)

TRAY
Worked in joined rounds from RS.
Base
With MC work 20 ch.
R1(RS): 2 sc in 3rd ch from hook (note that 2nd ch from hook acts as beg ch, which does not count as st and 1st ch from hook counts as 1chsp), 1 ch, 16 sc to last ch, 1 ch, 2 sc in last ch, 1 ch, rotate work to work along other side of foundation ch, 16 sc to last ch, slst in 1st chsp of R1. 36 st, 4 1chsp
R2(RS): 1 ch (does not count as st), [1 sc in 1chsp, 2 ch, 2 sc, 2 ch, 1 sc in 1chsp, 16 sc to next 1chsp] twice, slst to 1st st of R2, slst in 2chsp. 40 st, 4 2chsp
R3: 1 ch (does not count as st), [( 1dc, 2 ch, 1 sc) in 2chsp, sc to next 2chsp] four times, , slst to 1st st of this round, slst in 2chsp. 48 st, 4 2chsp
R4-5: Rep R3 twice more. 64 st, 4 2chsp
Fasten off MC.
R6: Join CC1 with slst, in 1st corner 2chsp of R5, 1 ch (does not count as st), [(1 sc, 2 ch, 1 sc) in 2chsp, 1 sc, * spiked hdc in st 2 rows below, spiked hdc in st 3 rows below, spiked hdc in next 2 sts 4 rows below, spiked hdc in st 3 rows below, spiked hdc in st 2 rows below, * 1 sc, (1 sc, 2 ch, 1 sc) in 2chsp, 2 sc, work spiked st rep * to * , 8 sc, work spiked st rep * to * , 2dc,] twice, slst to 1st st of R6. 72 st, 4 2chsp
Fasten off CC1.
R7-12: Join MC with slst, in 1st corner 2chsp of R6 and rep R3 six more times. 120 st, 4 2chsp
R13: Join CC2 with slst, in 1st corner 2chsp of R12, 1 ch (does not count as st), [(1 sc, 2 ch, 1 sc) in 2chsp, 2 sc, work R6 spiked st rep * to * , 8 sc, work R6 spiked st rep * to * , 1 sc, (1 sc, 2 ch, 1 sc) in 2chsp, 2 sc, work R6 spiked st rep * to * , {8 sc, work R6 spiked st rep * to * } twice, 2 sc,] twice, slst to 1st st of R13. 128 st, 4 2chsp
Fasten off CC2
Sides
R1(RS): Join MC with slst in 1st corner 2chsp of Base R13, 1 ch (does not count as st) [2 sc in 2chsp, sc in each st to next 2chsp] 4 times, slst to 1st st of R1. 136 st
R2(RS): 1 ch, sc to end, slst to 1st st of this round.
R3-6 Rep R2 four more times.
R7: Join CC1 with slst in 1st st of R6, 1 ch (does not count as st), 3 sc, work Base R6 spiked st rep * to * , 8 sc, work spiked st rep * to * , 7 sc, work Base R6 spiked st rep * to * , {8 sc, work Base R6 spiked st rep * to * , 7 sc, work Base R6 spiked st rep * to * , 8 sc, work Base R6 spiked st rep * to * , 7 sc, work Base R6 spiked st rep * to * , {8 sc, work Base R6 spiked st rep * to * } twice, 4 sc, slst to 1st st of R7.
Fasten off CC1.
R8: Join MC with slst in 1st st of R7, 1 ch (does not count as st), 9 sc, 8 ch, miss 8, 60 sc, 8 ch, miss 8, 51 sc, slst to 1st st of R8. 120 st, 2 8chsp
R9-10: Rep R2 three more times, working into all ch and sts. 136 st
Fasten off MC.
R11: Join CC2 with slst in 1st st of R10, 1 ch (does not count as st), 9 sc, 10 spiked sc in 8chsp, 60 sc, 10 spiked sc in 8chsp, 51dc, slst to 1st st of R11. [140 st]
R12: Slst in each st of R11
Fasten off.
Surface Slip Stitch Reinforcement
From RS, slip stitch across the 20 ch of the foundation chain.
FINISHING
Weave in ends and block to measurements in schematic.
Make it your own
Consider working the spiked stitch rows in different colours and textures of yarn from those shown, e.g. using MC instead of the contrast colours for a textured finish without colour or using a bouclé yarn for extra texture or use just one contrast colour or three contrast colours, you can even use different colours for each MC section or continue using the contrast colour you just used for a spiked stitch row for the following MC section.
Make a matching mat by just working the base section and edging with slst in each st and ch of R13. You could even make a set of placemats this way and store them in the tray when not in use.
How did it go?
I love to hear from anyone who uses one of my patterns to create a project. Any feedback you give about the pattern will help me develop future patterns that are easy to follow and it’s always exciting to see in-progress or finished projects created using my patterns. Use #crumblecustardtray on Instagram and do tag me in your post or caption!


Comments