How to Create Cherry Basket Cloth, with this Free Knitting Pattern
- Joanne

- Apr 15
- 4 min read
Updated: Apr 23

Create the cute Cherry Basket Cloth from this free knitting pattern that can also be used as a placemat, coaster or trivet to protect your surfaces. It's the perfect gift for a sweet friend or family member to show them how much you care!
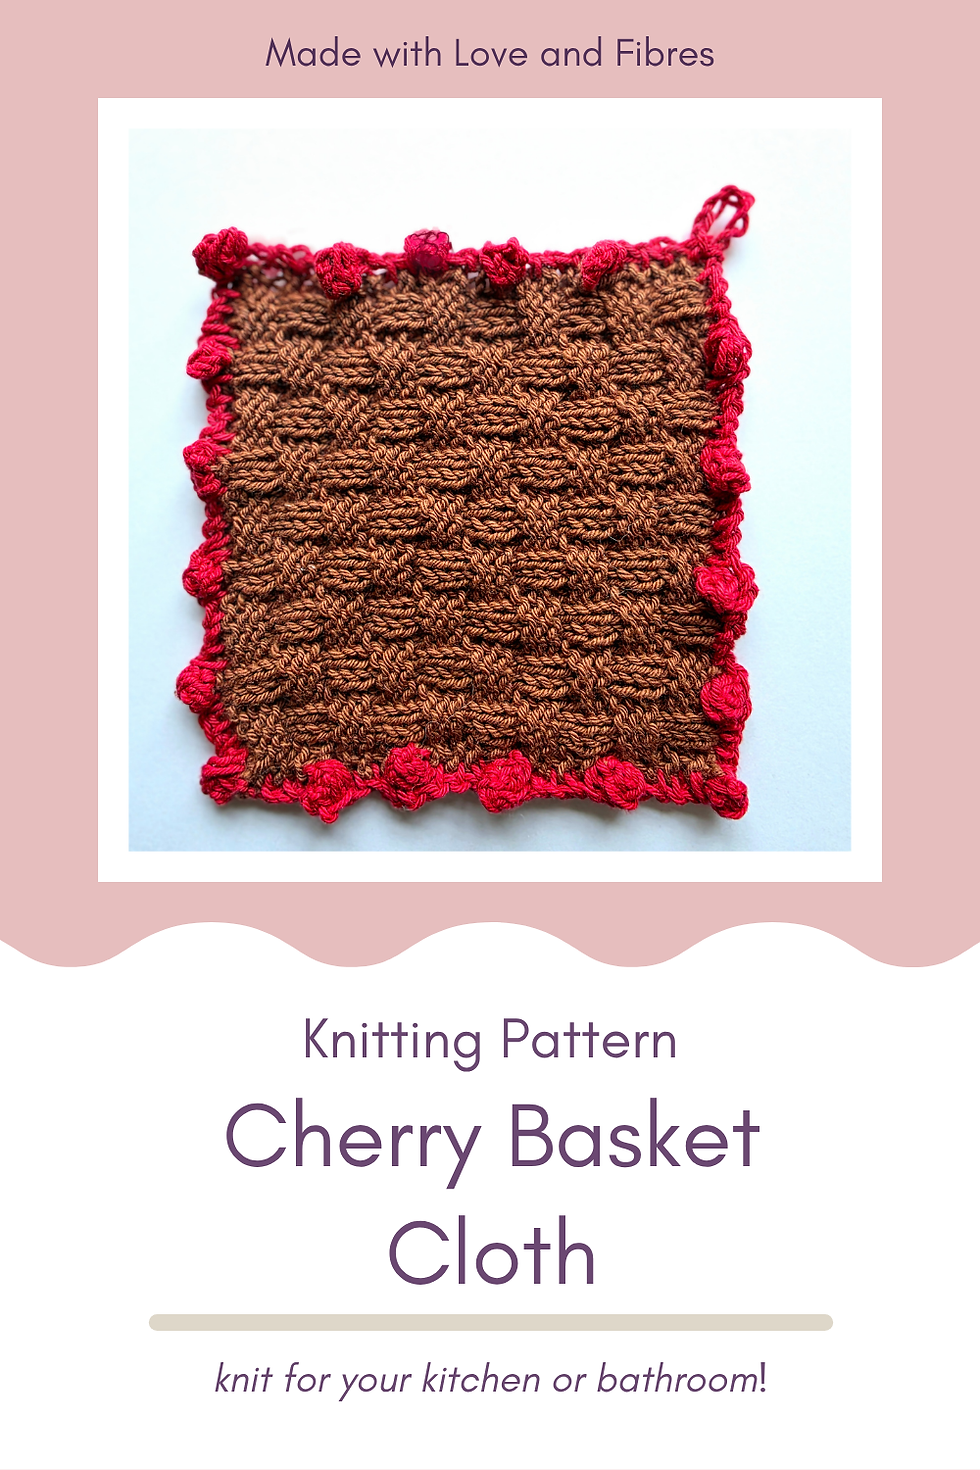
The Cherry Basket Cloth Free Knitting Pattern is inspired by the generously fruiting cherry tree we are lucky to have in our garden. It's about to blossom now as the pattern is released in April. Here's a photo:

A Gift for You
If you love making washcloths, did you know that I'm publishing a FREE washcloth pattern every month in 2026? Join my mailing list on this sign up page to get notified when each one is ready to make and you'll also get a copy of my sign-up gift, "The Yarncrafter’s Guide to Creating Sturdy Bags", a workbook with lots of tips, experiments and tests for yarns, tools, stitches etc. to help find the best ones for projects that would benefit from being more sturdy, whether that's a bag, a storage basket or a garment that needs to keep crisp lines or avoid sagging.
I hope you enjoy this fruit inspired washcloth pattern for knitters. They’re such fun small makes to work on between bigger projects and try out new stitches or techniques.
If you don't like reading patterns on blogs, there is also a printable pdf version available to purchase on Ravelry.

Why make the Cherry Basket Cloth from this free knitting pattern?
A lightweight, prettily-textured cloth with a wonderfully scrubby edging, this is a relaxing and fun knit with an easily remembered stitch pattern and a design that is motivating to complete.
Enhance its woven looking stitch with a wicker or willow basket shade and edge it with any of the beautiful red, gold or purple shades you’d associate with ripe cherries. Or perhaps you’d sooner stitch a basket of currants, blueberries, grapes, kumquats or another favourite small round/oval fruit…
Enjoy making your cloth!
Before you start:
Sizes:
One size with adjustment tips at end.
Tension:
20 sts x 30 rows = 10cm x 10cm / 4” x 4” measured over Basketweave Stitch
Working method
Centre is worked bottom up. Piece is edged in the round.
Finished measurements
a. Length: 16cm / 6.5”
b. Width: 16cm / 6.5”
Requirements

Yarnsmiths Cotton Aran; Aran/worsted weight; 80m (88 yd) per 50g skein; 100% cotton or similar (Sample worked in MC Coffee Bean 4079 and CC Scarlet Red 4100)
- MC: 40 m / 45 yd
- CC: 16 m / 18 yd
4mm / US 6 knitting needles for working in the round
Yarn needle and scissors
Abbreviations and Special Stitches
st/sts stitch/stitches
R Row/s or round/s
RS/WS right/wrong side
rep repeat
K knit
P purl
k2/3tog knit two/three sts together
Yo yarn over
Kfb knit into front and back of indicated st
p1tbl purl once through the back loop of indicated st
Mini Bobble: Place next cast on/off st or row end sts between garter ridges on passive needle tip, yo, kfb, turn, p2, p1tbl, turn, [kfb] 3 times, turn, [k3 tog] twice, pass last but one st over last st, pass yarn to RS and final st to working needle tip.
Pattern Notes
I sometimes add extra resources for my patterns, e.g. yarn substitutions, adaptations, styling suggestions or helpful video clips as updates on my original blog post for the release, so consider checking it out here.
Method
Centre SQUARE

Worked flat in rows
Cast on 30 sts in MC
R1(RS): Knit. 30 sts
R2 (WS): K2, [p2, k4] to last 4 sts, p2, k2.
R3: K1, p1, k2, [p4, k2] to last 2 sts, p1, k1.
R4: Rep R2.
R5: Knit.
R6: K5, [p2, k4] to last st, k1.
R7: K1, [p4, k2] to last 5 sts, p4, k1.
R8: Rep R6.
R9-R40 Rep R1-R8 five more times.
Cast off all sts and fasten off.
Edging

Worked in the round, from RS, around edge of Centre Square. Each corner st counts as the last st of the side you are on and the first stitch of the next side so you will work a mini bobble in it and pick up a stitch in it.
R1(RS): Join CC in final stitch of cast off row, * [pick up 1 st in next 3 end sts between garter ridges, mini bobble in next garter ridge] six times to end of side, noting that each repeat of this should work past one full row repeat of 8 rows, [pick up 1 st in next 4 cast on sts, mini bobble in next st] six times to end of side, rep from * once more noting that last st is made in same st as first st of Edging R1. 110 sts
R2(RS): * k2tog, slip resulting st on working needle back to non-working needle, rep from * to end of round. 1 st
Fasten off, drawing yarn tail through last st.
Finishing
Weave in ends and block to measurements provided.
A full video tutorial for this pattern is also available:
Make it your own
Length: for a longer/shorter cloth increase/reduce the number of repeats of R1-R8.
Width: add multiples of 6 sts to your cast on to increase the width of the cloth.
Create a hanging loop for your cloth, before fastening off Edging R2, by using a similar size of crochet hook to work 6-10 chains.
Yarn choice: any kind of plant fibre or washcloth yarn could be used. Using a different yarn weight with a needle set that matches the manufacturer’s recommendations will result in a smaller or larger cloth.
Colour changes: use up lots of different yarn scraps changing to a new colour every 4 rows for a bold colourful cloth or use a single colour for edging and centre for a more subtle look.
Remember that you’ll need to allow extra yarn for some changes.

How did it go?
I love to hear from anyone who uses one of my patterns to create a project. Any feedback you give about the pattern will help me develop future patterns that are easy to follow and it’s always exciting to see in-progress or finished projects created using my patterns. Use #cherrybasketcloth on Instagram and do tag me in your post or caption! You can find me on:
Instagram: madewithloveandfibres
Ravelry: Joanne Fowler
If you would like to keep up to date with what I’m working on, I send out a monthly email update with subscriber discounts, behind the scenes news and exclusive previews. Do sign up: Mailing List Sign up!


Comments